The right descaling procedure for your Saeco Odea depends on your espresso machine's serial number. Find out which procedure to follow.
How do I descale my Saeco Odea espresso machine?
Published on 2021-07-04
Which descaling procedure do I follow?
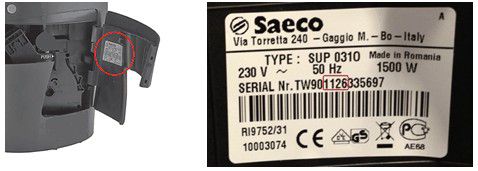
The procedure to follow depends on the type and serial number of your Saeco Odea and if your machine has been serviced. You find the type and serial number on the label on the inside of the service door.
Descaling procedure version 1 always applies if:
- The label shows serial number TW901249xxxx or higher
- The machine was serviced/repaired in one of our service centres after 3 December 2012 (as original instructions that came in the box do not apply anymore)
Descaling procedure version 2 always applies if:
- The label shows serial number TW901249xxxx or lower
Before you start the descaling cycle
- The complete descaling process takes about 30 minutes and consists of a descaling cycle and rinsing cycles
- Once started, the descaling procedure must be performed in full
- Use Saeco/Philips descaling solution CA7600 or CA6701. Never use vinegar as a decalcifier.
Before you start:
- Empty the drip tray
- Have a container available to collect the water during the descaling process
- Remove the INTENZA+ water filter from the water tank (if installed)
- Remove the Pannarello/Cappuccinatore/Automatic milk frother (if installed)
Descaling procedure 1
Attention: Once started, the descaling procedure must be performed in full.
Descaling cycle
1) Empty the water tank and pour the entire Philips/Saeco descaling solution into it. Fill it up with fresh water to the MAX level and put it back.
2) Place a container under the hot water/steam wand, and under the dispensing spout.
3) Press and hold the STEAM or HOT WATER BUTTON (depending on your machine) for about 6 seconds until the DESCALING LIGHT and the STEAM or HOT WATER BUTTON are turned on continuously
Importantant: If the TEMPERATURE LIGHT is illuminated continuously, you first need to vent the machine.
Turn the KNOB to the HOT WATER/STEAM position and wait until the TEMPERATURE LIGHT starts blinking.
Press and hold the STEAM BUTTON or HOT WATER BUTTON (depending on your machine) for about 6 seconds to begin the descaling process again.
4) The machine starts dispensing at regular intervals through the dispensing spout.
This takes about 10 minutes. Wait until the TEMPERATURE LIGHT is illuminated continuously.
Note: The STEAM or HOT WATER button (depending on your machine) illuminates continuously during the descaling cycle.
5) When the TEMPERATURE LIGHT illuminates continuously, turn the SELECTOR SWITCH to the HOT WATER/STEAM position.
The machine starts dispensing at regular intervals through the steam wand until the water tank is emptied.
This takes around 15 minutes. Wait until the TEMPERATURE LIGHT starts blinking.
6) When the TEMPERATURE LIGHT starts blinking and the ALARM LIGHT turns on, turn the SELECTOR SWITCH to the DOT position.
First rinsing cycle
7) Empty the containers and put them back. Rinse the water tank and fill it up to the MAX level with fresh water.
When you put the water tank back, the ALARM LIGHT turns off and the TEMPERATURE LIGHT is illuminated continuously.
8) Turn the SELECTOR SWITCH to the HOT WATER/STEAM position. Depending on your machine, the STEAM or HOT WATER BUTTON starts blinking.
Note: The STEAM or HOT WATER BUTTON continues blinking during the rinsing cycles.
9) When the TEMPERATURE LIGHT starts blinking, turn the SELECTOR SWITCH to the DOT position.
10) The machine starts dispensing water through the dispensing spout for about 2-3 minutes.
11) When the TEMPERATURE LIGHT illuminates continuously, turn the SELECTOR SWITCH to the HOT WATER/STEAM position.
The machine starts dispensing water through the steam wand until the water tank is empty. Wait until the ALARM LIGHT turns on.
Second rinsing cycle
12) Empty the containers and put them back. The ALARM LIGHT is still on.
Rinse the water tank and fill it up to the MAX level with fresh water. Put the water tank back in the machine.
Note: As soon as the water tank is returned to its position, the machine starts dispensing water through the steam wand.
13) At the end of the second rinsing cycle, the DESCALING LIGHT turns off and the machine automatically enters standby mode.
Turn the SELECTOR SWITCH to the DOT position.
Importantant: If the DESCALING LIGHT and the ALARM LIGHT stay on after the second rinsing cycle, the water tank was not filled up to the MAX during the rinsing cycles.
You need to perform another rinsing cycle. Repeat step 12 until the DESCALING LIGHT and the ALARM LIGHT turn off.
14) The TEMPERATURE LIGHT is blinking slowly, indicating that the machine is in standby mode. Press the COFFEE BUTTON to turn the machine back on.
15) Rinse the drip trays and put them back.
16) Reinstall the Pannarello / Cappuccinatore and INTENZA+ water filter (if applicable).
17) Rinse the water tank and fill it up to the MAX level with fresh water and put it back.
18) The machine is ready to brew coffee.
Descaling procedure 2
Descaling cycle
1) Empty the water tank and pour the entire Philips/Saeco descaling solution into it. Fill it up with fresh water to the MAX level and put it back.
2) Place a container under the hot water/steam wand.
3) Press the HOT WATER button (if your model has a STEAM BUTTON, you can skip this step).
4) Turn the SELECTOR SWITCH to the STEAM/HOT WATER position and dispense ca. 300 ml of descaling fluid into the container.
5) To stop dispensing, turn the SELECTOR SWITCH to the DOT position.
6) Empty the container, place it back and turn off the machine for 10 minutes.
7) Turn the machine back on after 10 minutes and repeat steps 3-5 until the water tank is emptied and the ALARM LIGHT turns on. Turn the SELECTOR SWITCH to the DOT position.
First rinsing cycle
8) Empty the container and place it back. Rinse the water tank and fill it up to the MAX level with fresh water.
9) Press the HOT WATER BUTTON if it is not illuminated (if your model has a STEAM BUTTON, you can skip this step).
10) Turn the SELECTOR SWITCH to the STEAM/HOT WATER position. The machine starts dispensing water through the steam wand.
11) Turn the SELECTOR SWITCH to the DOT position when the water tank is emptied.
Second rinsing cycle
12) Empty the container and place it back. Rinse the water tank and fill it up to the MAX level with fresh water.
13) Press the HOT WATER BUTTON if it is not illuminated (if your model has a STEAM BUTTON, you can skip this step).
14) Turn the SELECTOR SWITCH to the STEAM/HOT WATER position. The machine starts dispensing water through the steam wand.
15) Turn the SELECTOR SWITCH to the DOT position when the water tank is emptied.
16) Press and hold (for about 6 seconds) the HOT WATER or STEAM BUTTON (depending on your machine) until the DESCALING LIGHT turns off.
17) Rinse the water tank and fill it up to the MAX level with fresh water. Put it back in the machine.
18) Rinse the drip tray and put it back.
19) Reinstall the Pannarello / Cappuccinatore and INTENZA+ water filter (if applicable).
20) The machine is now ready to brew a coffee again.