Urime për blerjen tuaj dhe mirë se vini pranë Philips Avent! Për të përfituar plotësisht nga mbështetja që ofron \"Philips Avent\", regjistrojeni produktin në faqen www.philips.com/welcome.
To learn more about your new Philips Avent Premium 2-in-1 Warmer & Sterilizer, click here.
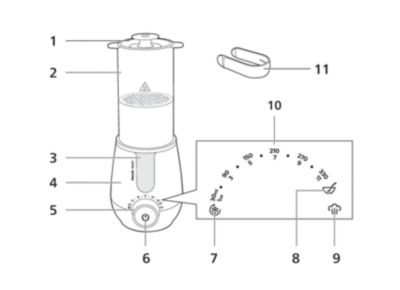
| 1 | Kapakun | 6 | Butoni i energjisë |
| 2 | Aparat sterilizimi | 7 | Cilësimi i mbajtjes së ngrohtë/shkrirjes |
| 3 | Dritare | 8 | Cilësimi i ngrohjes së ushqimit për foshnja |
| 4 | Bazamenti | 9 | Përgatitja për sterilizim |
| 5 | Treguesi i ecurisë | 10 | Cilësimi i vëllimit të qumështit |
| 11 | Tongs* |
*Available with SCF359/20, SCF359/21 only.
Lexoni me kujdes këtë informacion të rëndësishëm përpara se ta vini në punë pajisjen dhe ruajeni për referencë në të ardhmen.
Paralajmërim
- Për të shmangur goditjet elektrike, mos i zhytni kabllot, prizat ose pajisjen në ujë apo në lëngje të tjera.
- Mosndjekja e udhëzimeve për zhgëlqerëzimin mund të shkaktojë dëmtim të pariparueshëm.
- Mos çmontoni kurrë bazën për të shmangur rrezikun e goditjes elektrike.
- Një kabllo e shkurtër furnizimi me energji është siguruar për të reduktuar rrezikun e ngatërrimit ose pengimit nga një kabllo më e gjatë. Kabllot zgjatuese më të gjata janë të disponueshme dhe mund të përdoren nëse tregoni kujdes gjatë përdorimit të tyre. Nëse përdoret një kabllo zgjatuese e gjatë, fuqia e specifikuar elektrike e kabllos duhet të jetë të paktën e barabartë me fuqinë elektrike të pajisjes, dhe kablloja më e gjatë duhet të vendoset në mënyrë që të mos shtrihet mbi banak apo tavolinë, ku mund të shkaktojë pengesa ose të tërhiqet nga fëmijët. Kablloja zgjatuese duhet të jetë e tipit me tokëzim, me 3 fije.
- Përdoreni pajisjen vetëm në ambiente të mbyllura.
- Mos e lini kordonin elektrik të varet në skajin e tavolinës apo banakut dhe mos e lejoni atë të prekë në sipërfaqe të nxehta.
- Ruajeni pjesën e tepërt të kabllos duke përdorur funksionin e mbështjelljes së kabllos në bazën e pajisjes.
- Pajisjen lidheni vetëm me priza të tokëzuara. Sigurohuni gjithnjë që spina të futet siç duhet në prizë.
- Para përdorimit të pajisjes, kontrolloni nëse tensioni i treguar në pjesën e poshtme përputhet me tensionin lokal.
- Nëse ju duhet të përdorni një kordon zgjatues, sigurohuni të jetë kordon i tokëzuar zgjatues me specifikim prej së paku 13 amperësh.
- Mos e përdorni asnjë pajisje me kabllo ose prizë të dëmtuar, ose pas ndonjë defekti ose dëmtimi të pajisjes në asnjë mënyrë. Kthejeni pajisjen te objekti i autorizuar më i afërt i shërbimit për ekzaminim, riparim, ose rregullim.
- Mos e vendosni pajisjen mbi ose pranë një sobe me gaz apo elektrike që është e nxehur, ose brenda një furre të ndezur.
- Kjo pajisje mund të përdoret nga fëmijë me aftësi të reduktuara fizike, shqisore apo mendore, apo që kanë mungesë përvoje dhe njohurish vetëm nëse u kushtohet mbikëqyrja e duhur apo u jepen udhëzime në lidhje me përdorimin e sigurt të pajisjes, si dhe të kuptojnë rreziqet e përfshira.
- Kjo pajisje nuk duhet përdorur nga fëmijët. Mbajeni pajisjen dhe kordonin larg vendeve ku mund të arrihet nga fëmijët. Fëmijët duhen mbikëqyrur për t'u siguruar që të mos luajnë me pajisjen.
- Mos derdhni ujë mbi spinën elektrike.
- Përdoreni pajisjen vetëm sipas përshkrimit në manualin e përdorimit për të evituar lëndimet për shkak të keqpërdorimit.
- Mos e parangrohni pajisjen.
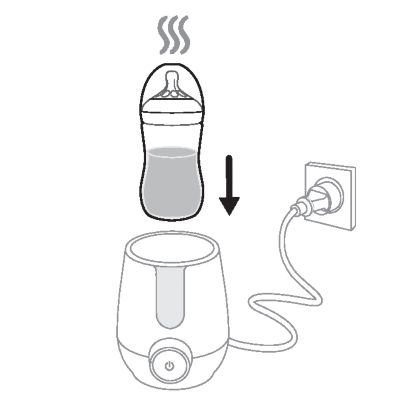
- Kur ngrohni qumështin, vendosni gjithmonë në ngrohësin e biberonit një biberon të montuar plotësisht me kapak, përpara se të shtoni ujin.
- Sigurohuni të shtoni ujë përpara se ta ndizni ngrohësen e shishes.
- Uji i nxehtë mund të shkaktojë djegie të rënda. Bëni kujdes kur pajisja përmban ujë të nxehtë.
-
- Sipërfaqet e arritshme të pajisjes mund të nxehen gjatë përdorimit dhe mund të mbesin të tilla pas përdorimit.
- Mos e hiqni pajisjen kur përmban ujë të nxehtë.
- Kur ushqimi apo qumështi ka arritur temperaturën e kërkuar, hiqeni shishen ose enën nga ngrohësja e shishes. Nëse e lini ushqimin apo qumështin në ngrohësen e shishes, temperatura e ushqimit apo e qumështit do të rritet.
- Pajisja nuk përmban pjesë të cilave mund t'u bëhen shërbime servisi. Mos provoni ta hapni, t'i bëni servis apo riparoni vetë pajisjen.
- Pajisja nxehet jashtëzakonisht shumë gjatë përdorimit dhe mund të shkaktojë djegie nëse preket. Mos i prekni sipërfaqet e nxehta. Përdorni vetëm dorezat ose çelësat.
- Tregoni kujdes ndaj avullit të nxehtë që del nga vrima e ajrimit në kapak ose kur hiqni kapakun. Avulli mund të shkaktojë djegie.
- Mos e prekni bazën, pjesën e sterilizimit ose kapakun gjatë ose menjëherë pas procesit, pasi ato mund të jenë shumë të nxehta. Lëreni pajisjen të ftohet në temperaturë ambienti përpara se ta hapni. Kapakun dhe pjesën e sterilizimit ngrijini vetëm nga dorezat e tyre.
- Mos e zhvendosni apo mos e hapni kurrë pajisjen kur është në përdorim ose kur uji në të është ende i nxehtë.
- Mos vendosni kurrë artikuj mbi pajisje gjatë kohës që është në përdorim.
- Përdorni vetëm ujë pa shtesa të tjera.
- Mos vendosni zbardhues ose kimikate të tjera në pajisje.
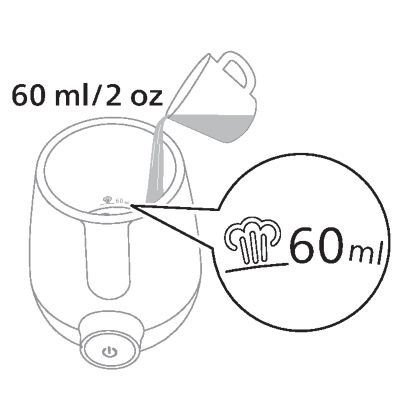
- Për sterilizim, mos derdhni ujë mbi shenjën në rezervuar ose mbi 60 ml.
- Sterilizoni vetëm biberonët e foshnjave dhe artikuj të tjerë të përshtatshëm për këtë pajisje. Kontrolloni manualin e përdoruesit për artikujt që dëshironi të sterilizoni, për t'u siguruar që ato janë të përshtatshme për këtë pajisje.
- Nëse dëshironi të ndaloni procesin, shtypni butonin e Energjisë për të fikur pajisjen.
- Për të shkëputur pajisjen, shtypni butonin e energjisë për ta fikur, pastaj hiqni prizën nga foleza ne mur.
- Kjo pajisje synohet vetëm për përdorim shtëpiak.
- Mos e përdorni pajisjen për qëllime të tjera përveç përdorimit të synuar të saj, për të evituar lëndimin e mundshëm.

- Kjo pajisje synohet për përdorim shtëpiak dhe për përdorime të ngjashme si p.sh. shtëpi ferme, akomodimet me shtrat dhe mëngjes (hostels), zona kuzhine të personelit në dyqane, zyra apo ambiente të tjera pune, si dhe nga vizitorët në hotele, motele dhe ambiente të tjera banimi.
- Ushqimi nuk duhet ngrohur për shumë kohë.
- Para se të shërbeni, sigurohuni që ushqimi të jetë në temperaturën e sigurt dhe hiqni kabllon nga priza në mur. Mos e lini kabllon në arritje të fëmijëve. Për të kontrolluar temperaturën e qumështit, përziejeni me të lehtë shishen dhe kontrollojeni duke hedhur ca pika nga ana e brendshme e kyçit të dorës.
- Hiqni pajisjen nga priza kur nuk është në përdorim dhe para pastrimit. Lëreni pajisjen të ftohet përpara se të vendosni ose hiqni pjesët.
- Sipërfaqja e rezistencës mund të ketë nxehtësi të mbetur edhe pas përdorimit.
- Lëreni pajisjen të ftohet përpara se ta pastroni.
- Mos përdorni kurrë aksesorë ose pjesë nga prodhues të tjerë ose që \"Philips\" nuk i rekomandon posaçërisht. Përdorimi i pjesëve ndihmëse që nuk janë rekomanduar nga prodhuesi i pajisjes mund të shkaktojë lëndime. Nëse përdorni aksesorë apo pjesë të tilla, garancia juaj bëhet e pavlefshme.
- Lëreni gjithnjë pajisjen të ftohet përpara se ta zhvendosni apo ta vendosni në ruajtje..
- Mos sterilizoni artikuj shumë të vegjël që mund të bien përmes vrimave në sitat në bazë dhe në pajisjen e sterilizimit.
- Mos e ekspozoni pajisjen ndaj diellit të drejtpërdrejtë ose temperaturave ekstreme.
- Mos vendosni kurrë artikuj direkt mbi elementin nxehës kur pajisja është e ndezur.
- Mos e përdorni pajisjen nëse është rrëzuar apo ka pësuar ndonjë dëmtim. Çdo shërbim tjetër duhet të kryhet nga një përfaqësues i autorizuar i shërbimit. Çojeni në një qendër shërbimi të autorizuar të \"Philips\" për riparim.
- Gjithmonë vendoseni dhe përdoreni pajisjen mbi një sipërfaqe të thatë, të qëndrueshme, të niveluar dhe horizontale.
- Mos e vendosni pajisjen mbi sipërfaqe të nxehta.
- Derdheni gjithmonë ujin e mbetur në pajisje pas përdorimit dhe kur pajisja të jetë ftohur.
- Fikeni pajisjen dhe hiqeni nga furnizimi me energji elektrike përpara se të ndryshoni aksesorët ose përpara se t'u afroheni pjesëve që lëvizin gjatë përdorimit.
- Për udhëzime të detajuara për pastrimin, shikoni udhëzuesin e shpejtë për fillestarët.
- Kushtet e ambientit, si temperatura dhe lartësia, mund të ndikojnë në funksionimin e pajisjes.
- Gjithmonë hiqeni pajisjen nga furnizimi me energji elektrike kur nuk është nën mbikëqyrje.
- Mos u përpiqni ta hapni apo riparoni vetë pajisjen. Kontaktoni me Qendrën e Shërbimit ndaj Klientit të \"Philips\" për shtetin tuaj (shihni www.philips.com/support).
- Data e kodit të prodhimit YYWW ndodhet në folenë e mbajtjes së kabllos në bazamentin e pajisjes.
- Ndaloni përdorimin e pajisjes nëse vëreni plasaritje, deformime, çngjyrosje ose dëmtime sipërfaqësore, pasi kjo mund të rrisë transferimin e substancave dhe ta bëjë atë të papërshtatshëm për kontakt me ushqimin.
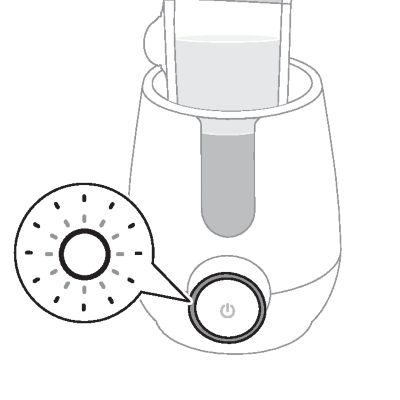
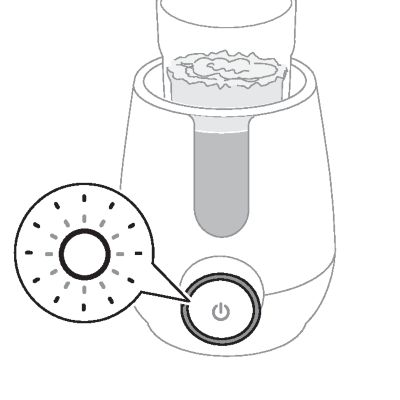
Progress indicator

The progress indicator flashes in different patterns to indicate different performance modes and operations.
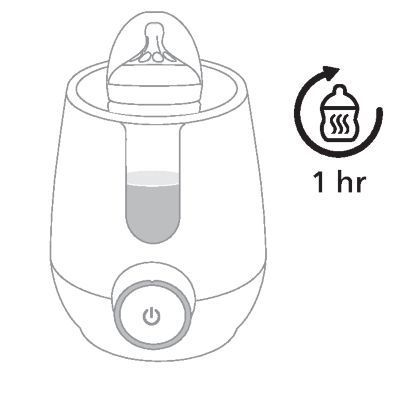
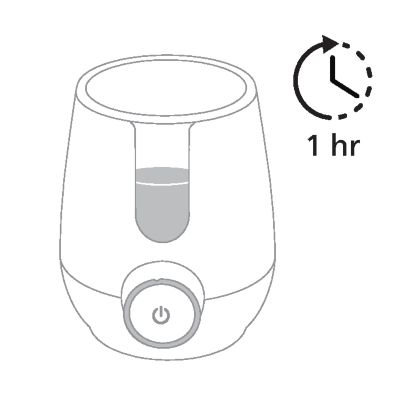
- Milk warming: During warming, the indicator flashes and fills gradually to show progress. When warming is complete, it changes to solid on for 1 hour (including warming time).
- Sterilization mode: During sterilization, the indicator flashes and fills gradually to show progress. When sterilization is complete, it turns off completely.
- Keep warm/defrost | Baby food warming: The entire indicator flashes continuously during warming/defrosting. When warming/defrosting is complete, the indicator changes to solid on for one hour (including warming time).
- No water: The entire indicator flashes rapidly and continues until the power button is pressed.
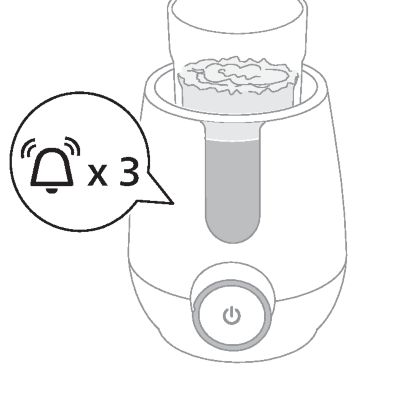
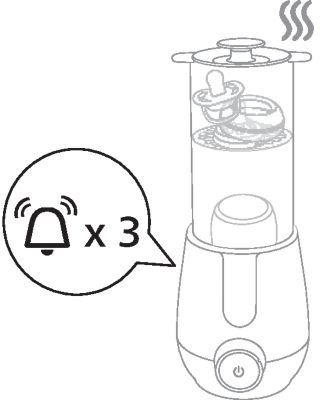
Alert sound

The appliance plays an alert sound to notify you of different statuses. It can be switched on and off as needed by following this video guide or using the directions below. The different alerts are as follows.
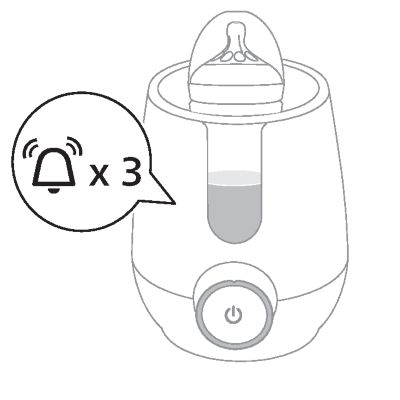
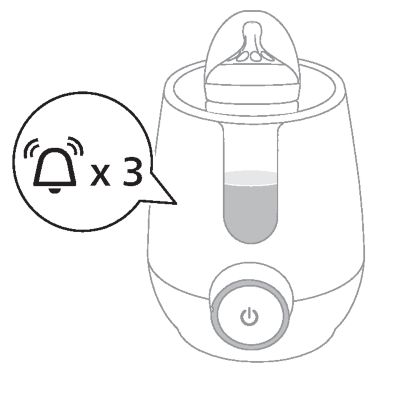
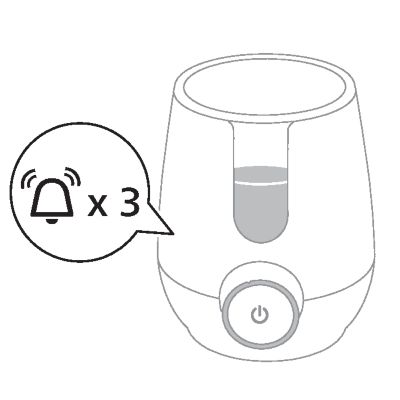
- Mode finished: Beeps 3 times when bottle warming, sterilization, the keep warm/defrost setting and baby food warming are complete.
- Sterilizing starts: Beeps 1 time.
- No water: Makes 1 long beep when the appliance runs out of water.
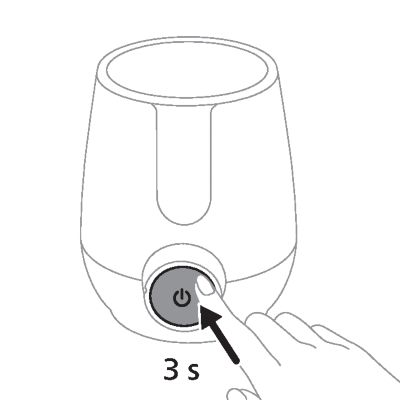
Turning off the alert sound
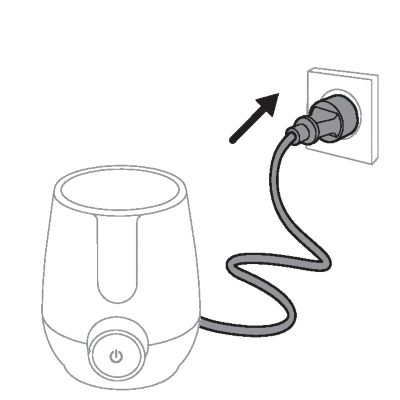
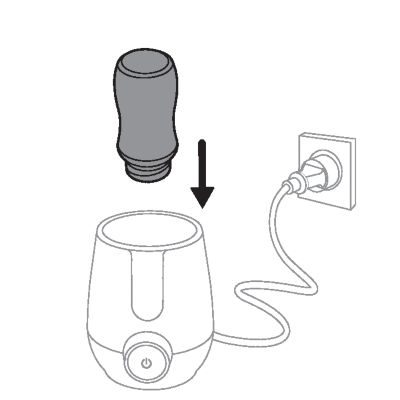
- Plug in the appliance.
-
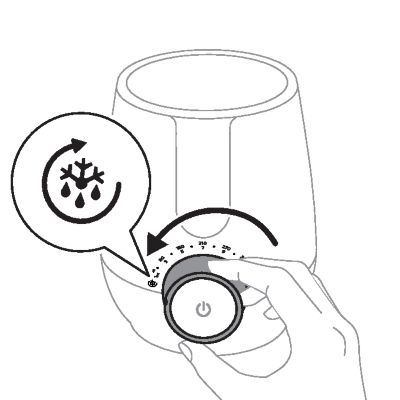
- Select the keep warm/defrost setting.
-
- Press and hold the power button for 3 seconds.
-
- The appliance beeps once to show the alert sound is off.

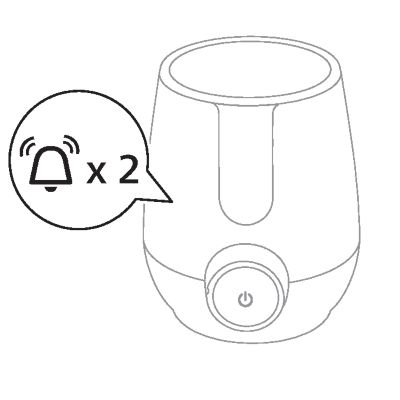
Turning on the alert sound
- Plug in the appliance.
-
- Select the keep warm/defrost setting.
-
- Press and hold the power button for 3 seconds.
-
- The appliance beeps twice to show the alert sound is on.
Milk volume
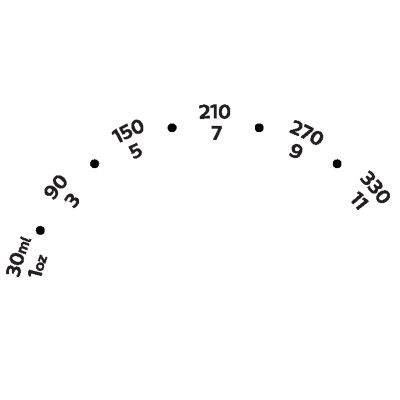
Select this setting for warming milk that is refrigerated or room temperature.
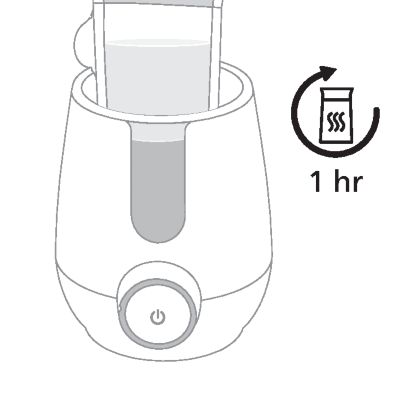
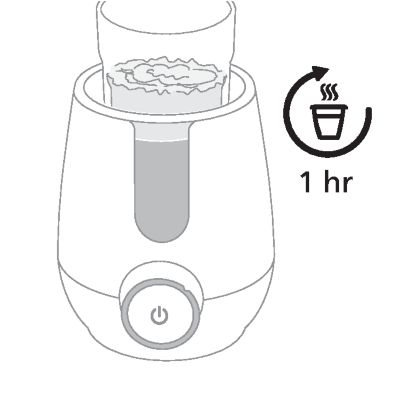
- The bottle warmer warms the milk to the desired temperature. Milk is ready for feeding when the appliance beeps 3 times and the entire progress indicator lights up. For warmer milk, leave the bottle in the appliance until it reaches the desired temperature.
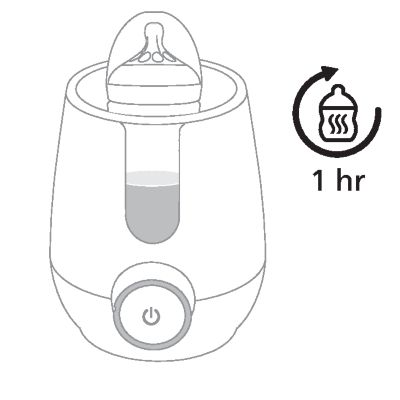
- When warming is complete, the appliance automatically switches to the keep warm setting and keeps milk warm for up to 60 minutes (including warming time) or when the power button is pressed.
- Do not rewarm milk after is has cooled down to avoid encouraging bacteria growth.
Milk may feel cold to you, but most babies will accept milk that is colder than body temperature.
Sterilizing

Use this mode for sterilizing your bottles and baby items. A full cycle takes around 7 minutes.
Baby food warming

Select this setting for warming baby food.
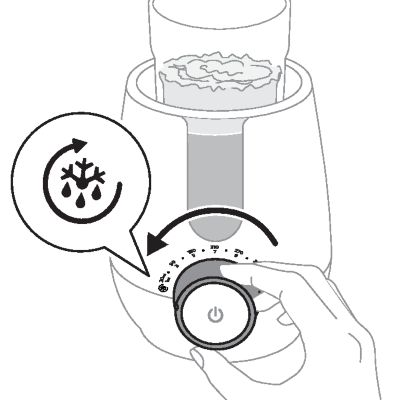
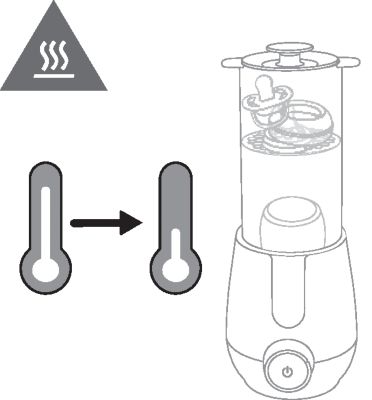
Keep warm/defrost
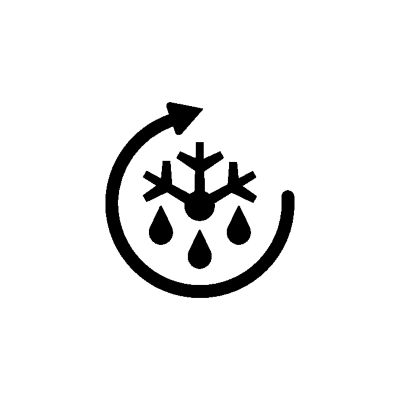
Use this setting for keeping milk warm and defrosting frozen milk and baby food.
- The built-in sensor adjusts the heating pattern.
- If milk or baby food is already warm, it is warmed gradually and kept at the required temperature.
- If milk is frozen, it will be defrosted until it becomes liquid and then warmed to the required temperature.
- If baby food is frozen, it is defrosted, then the appliance must be switched off and then back on, and the food must be warmed using baby food warming mode.
Read the following information carefully to make sure your milk bottles and storage containers are compatible with this product.
Compatible bottles and containers (warming)
- All Philips Avent milk bottles and baby food containers, and most commonly-used bottles and baby food containers from other major brands.
- Materials: plastic, glass, silicone, and milk storage bags.
- Check milk storage bag instructions to make sure they are safe for use.
- The max milk and food volumes supported for warming are as follows:
- Liquid milk: 30-330 ml/1-11 oz
- Frozen milk: 30-180 ml/1-6 oz
- Baby food: 30-180 ml/1-6 oz
- Liquid milk: 30-330 ml/1-11 oz
- Frozen milk: 30-180 ml/1-6 oz
- Baby food: 30-180 ml/1-6 oz
- Liquid milk: 30-330 ml/1-11 oz
- Frozen milk: 30-180 ml/1-6 oz
- Baby food: 30-180 ml/1-6 oz
Compatible bottles and containers (sterilization)
- Any milk bottle with with a height of 17 cm (6.7 in) or less.
- Any baby items that fit in the sterilization attachment and are safe for sterilization by steam.
- Check the instructions for your baby items to make sure they are safe for sterilization.
To quickly learn how to warm milk in plastic bottles, check out our helpful how-to video here.
You can also follow the directions below.
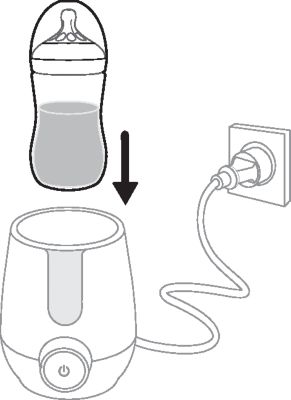
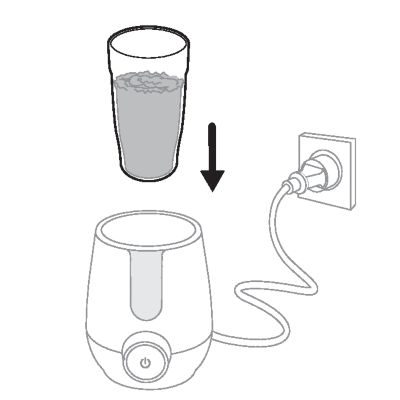
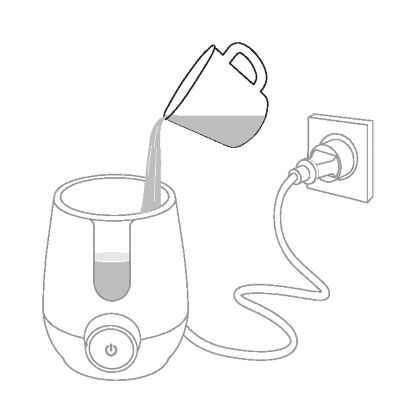
- Plug in the appliance and place the bottle inside.
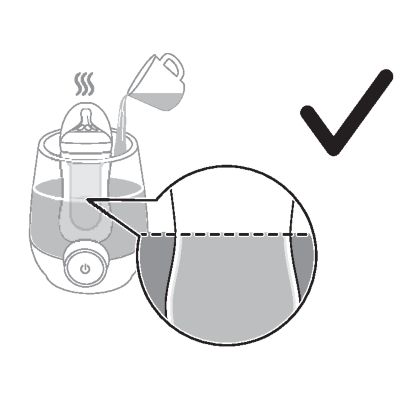
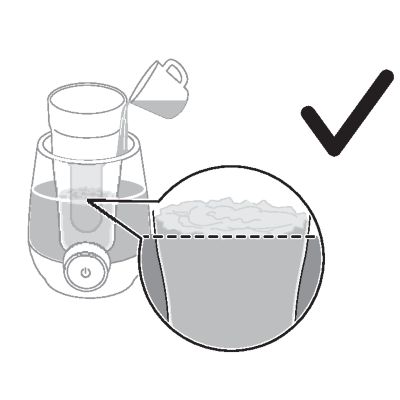
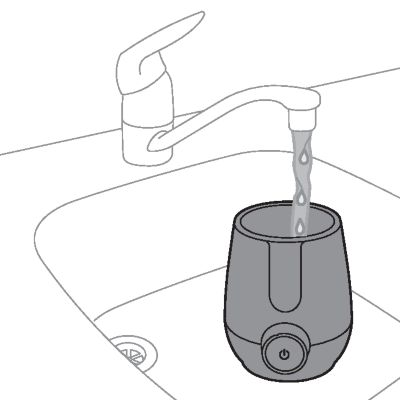
- Add water:
- Only use room temperature water for accurate warming results.
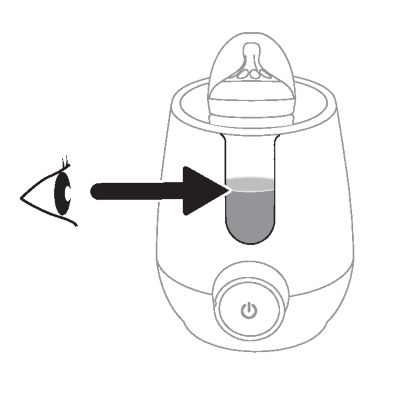
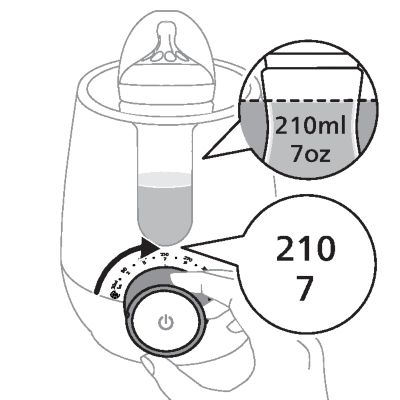
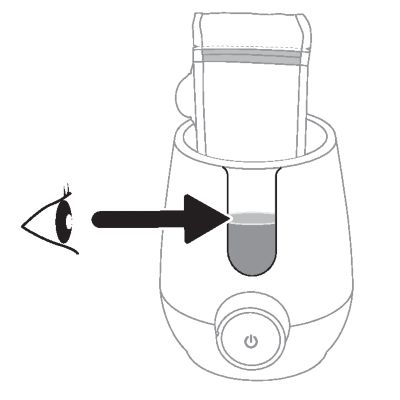
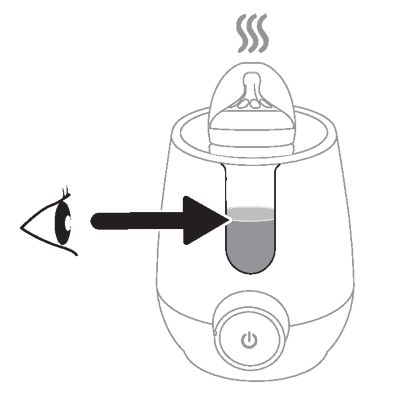
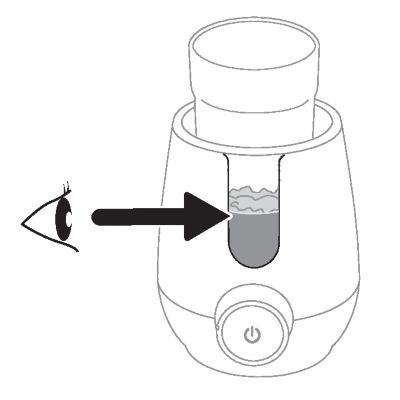
- Use the window on the front of the appliance to check the water level.
-
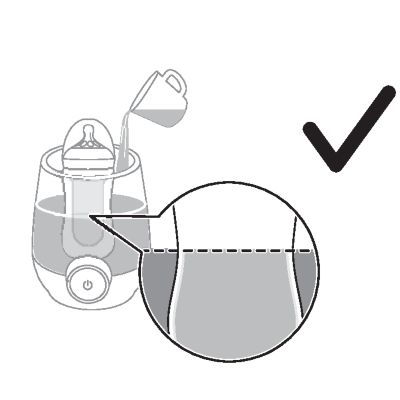
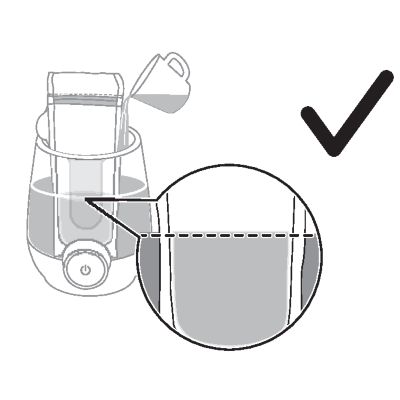
- For small milk volumes, add water up to the level of the milk.
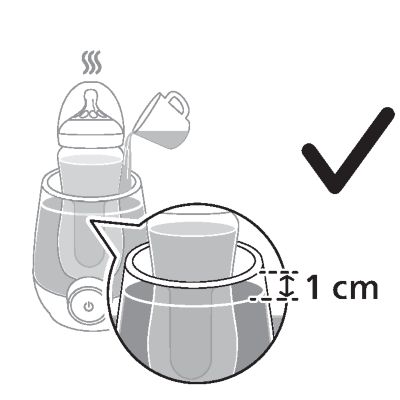
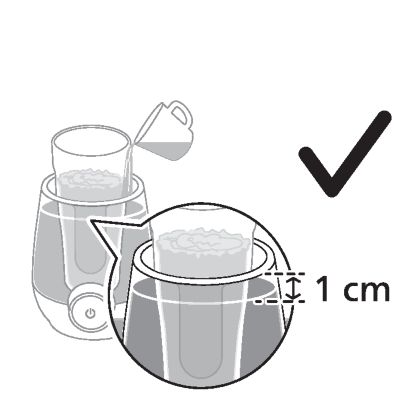
-
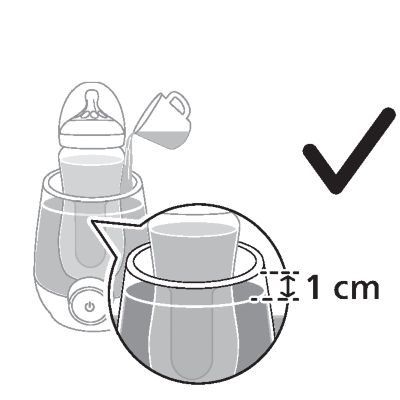
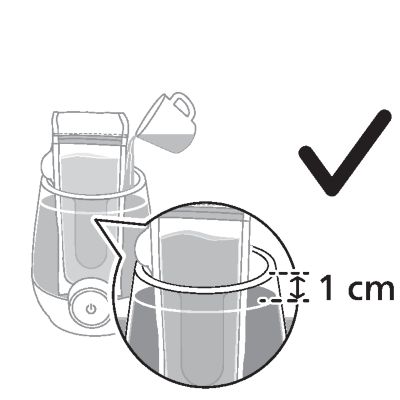
- For large milk volumes above the top of the base, fill up to 1 cm/0.4 in below the rim of the base.
-
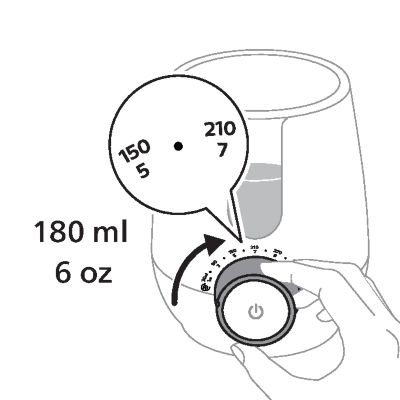
- Select a setting based on the milk volume.
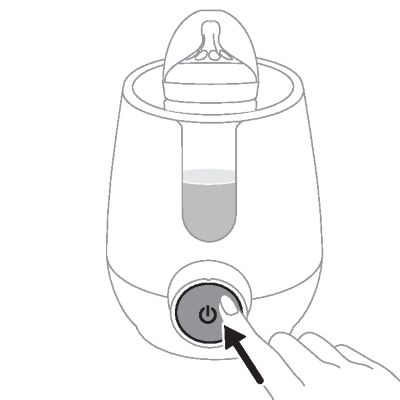
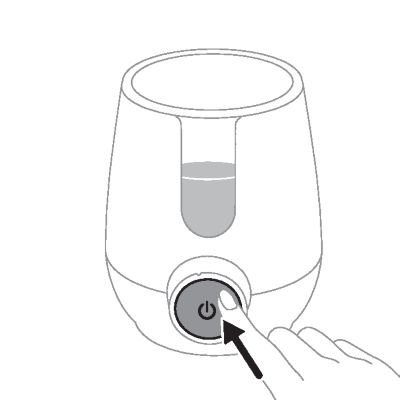
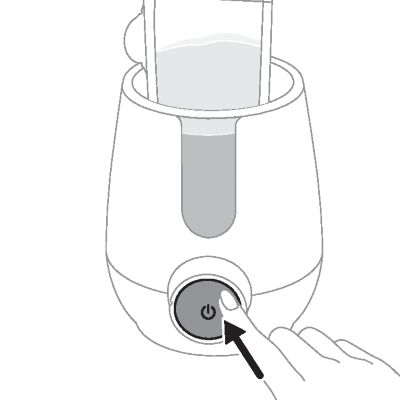
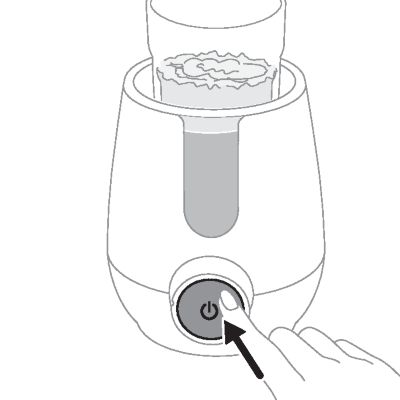
- Press the power button to start.
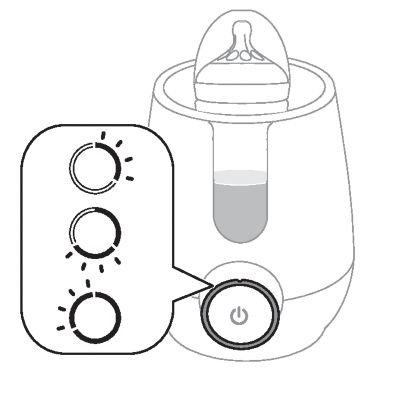
- The progress indicator flashes and fills gradually to show progress.
- When warming is complete, the appliance beeps 3 times and the progress indicator is solid on.
- The appliance changes to keep warm mode and switches off automatically after 60 minutes (including warming time).
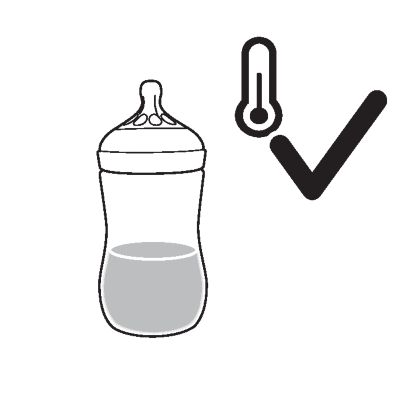
- Before feeding your baby, take out the bottle and check whether the milk is at a safe temperature.
- Be careful of hot water when removing the bottle.
- Always check milk temperature before feeding your baby.
- Press the power button to switch off the appliance.
- Let the water cool down, then unplug the appliance and pour out the water sideways into the sink to avoid spilling on the knob or mains plug.
To quickly learn how to warm milk in glass and silicone bottles, check out our helpful how-to video here.
You can also follow the directions below.
- Plug in the appliance and place the bottle inside.
- Add water:
- Only use room temperature water for accurate warming results.
- Use the window on the front of the appliance to check the water level.
-
- For small milk volumes, add water up to the level of the milk.
-
- For large milk volumes above the top of the base, fill up to 1 cm/0.4 in below the rim of the base.
-
- Select a setting based on the milk volume.
- Glass bottles warm quickly. Use a lower setting. Check the table in the Recommmended settings by milk container type section for more info.
- Press the power button to start.
- The progress indicator flashes and fills gradually to show progress.
- When warming is complete, the appliance beeps 3 times and the progress indicator is solid on.
- The appliance changes to keep warm mode and switches off automatically after 60 minutes (including warming time).
- Continue warming silicone bottles for an additional 3-4 minutes for best results.
- Before feeding your baby, take out the bottle and check whether the milk is at a safe temperature.
- Be careful of hot water when removing the bottle.
- Always check milk temperature before feeding your baby.
- Press the power button to switch off the appliance.
- Let the water cool down, then unplug the appliance and pour out the water sideways into the sink to avoid spilling on the knob or mains plug.
To quickly learn how to warm milk in milk bags, check out our helpful how-to video here.
You can also follow the directions below.
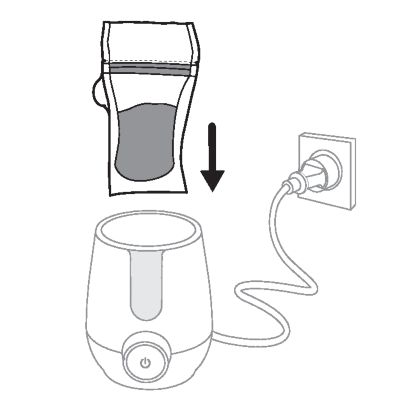
- Plug in the appliance and place the milk bag inside.
- Check your milk bag's instructions to make sure it is safe for warming.
- Add water:
- Only use room temperature water for accurate warming results.
- Use the window on the front of the appliance to check the water level.
-
- For small milk volumes, add water up to the level of the milk.
-
- For large milk volumes above the top of the base, fill up to 1 cm/0.4 in below the rim of the base.
-
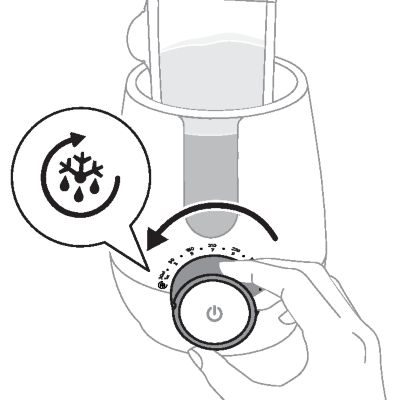
- Select the keep warm/defrost setting.
- Using the keep warm/defrost setting is recommended, as milk bags warm more quickly.
- Press the power button to start.
- The full progress indicator flashes to show warming is in progress.
- When warming is complete, the appliance beeps 3 times and the progress indicator is solid on.
- The appliance changes to keep warm mode and switches off automatically after 60 minutes (including warming time).
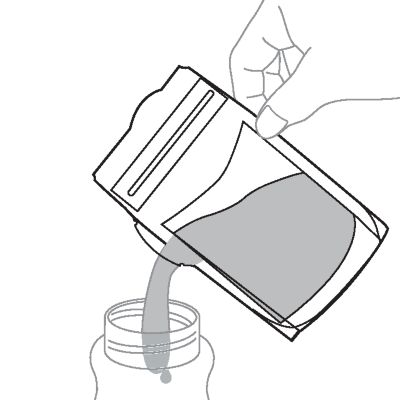
- Take out the milk bag and pour the milk into a bottle.
- Be careful of hot water when removing the milk bag.
- Before feeding your baby, check whether the milk is at a safe temperature.
- Always check milk temperature before feeding your baby.
- Press the power button to switch off the appliance.
- Let the water cool down, then unplug the appliance and pour out the water sideways into the sink to avoid spilling on the knob or mains plug.

To quickly learn how to defrost and warm frozen milk, check out our helpful how-to video here.
You can also follow the directions below.
The keep warm/defrost setting is used for defrosting milk. For this setting, the appliance's built-in sensor detects the temperature of the container contents and adjusts the heating pattern between defrosting them or keeping them warm. When warming frozen milk, the bottle warmer defrosts the milk to a liquid state and then warms it to the desired temperature.
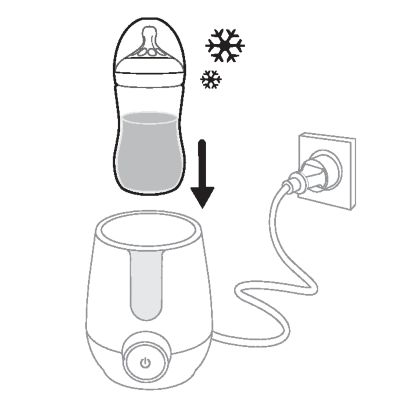
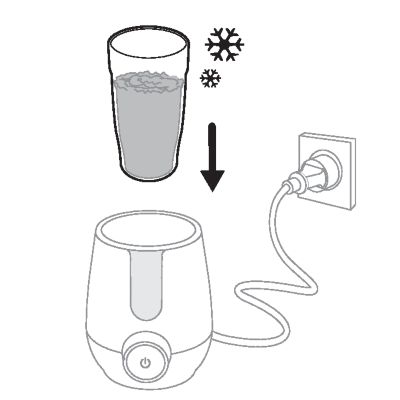
- Plug in the appliance and place the container with the frozen milk inside.
- Only use plastic milk bottles or milk bags for freezing milk. Glass bottles may break when defrosting.
- Add water:
- Only use room temperature water for accurate warming results.
- Use the window on the front of the appliance to check the water level.
-
- For small milk volumes, add water up to the level of the milk.
-
- For large milk volumes above the top of the base, fill up to 1 cm/0.4 in below the rim of the base.
-
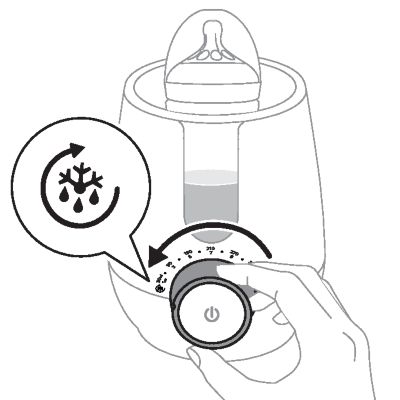
- Select the keep warm/defrost setting.
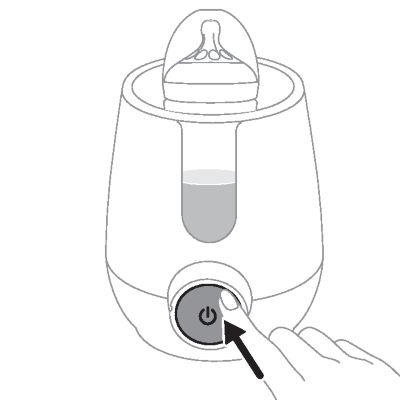
- Press the power button to start.
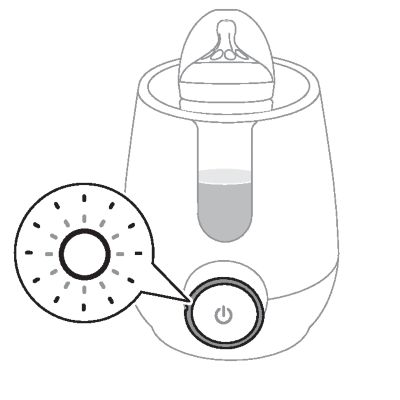
- The full progress indicator flashes to show defrosting is in progress.
- Determining precise warming times for frozen milk is not possible due to variations in consistency.
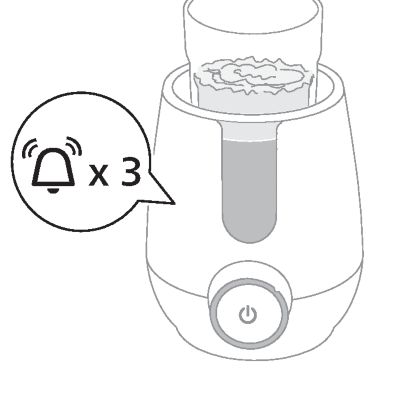
- When warming is complete, the appliance beeps 3 times and the progress indicator is solid on.
- The appliance changes to keep warm mode and switches off automatically after 60 minutes (including warming time).
- Before feeding your baby, take out the milk and check whether it is at a safe temperature.
- Be careful of hot water when removing the bottle.
- Always check milk temperature before feeding your baby.
- Press the power button to switch off the appliance.
- Let the water cool down, then unplug the appliance and pour out the water sideways into the sink to avoid spilling on the knob or mains plug.
To quickly learn how to use the keep warm/defrost setting to keep milk warm, check out our helpful how-to video here.
You can also follow the directions below.
For this setting, the appliance's built-in sensor detects the temperature of the container contents and adjusts the heating pattern between defrosting them or keeping them warm. When using this setting for milk that has already been warmed, the milk is warmed gradually and kept at a consistent temperature.
- Plug in the appliance and place the bottle inside.
- Add water:
- Only use room temperature water for accurate warming results.
- Use the window on the front of the appliance to check the water level.
-
- For small milk volumes, add water up to the level of the milk.
-
- For large milk volumes above the top of the base, fill up to 1 cm/0.4 in below the rim of the base.
-
- Select the keep warm/defrost setting.
- Press the power button to start.
- The full progress indicator flashes to show warming is in progress.
- When warming is complete, the appliance beeps 3 times and the progress indicator is solid on.
- The appliance continues keeping the milk warm using keep warm mode and switches off automatically after 60 minutes (including warming time).
- Before feeding your baby, take out the milk and check whether it is at a safe temperature.
- Be careful of hot water when removing the bottle.
- Always check milk temperature before feeding your baby.
- Press the power button to switch off the appliance.
Let the water cool down, then unplug the appliance and pour out the water sideways into the sink to avoid spilling on the knob or mains plug.
To quickly learn how to warm baby food, check out our helpful how-to video here.
You can also follow the directions below.
- Plug in the appliance and place the container with the baby food inside.
- Add water:
- Only use room temperature water for accurate warming results.
- Use the window on the front of the appliance to check the water level.
-
- For small food volumes, add water up to the level of the food.
-
- For large food volumes above the top of the base, fill up to 1 cm/0.4 in below the rim of the base.
-
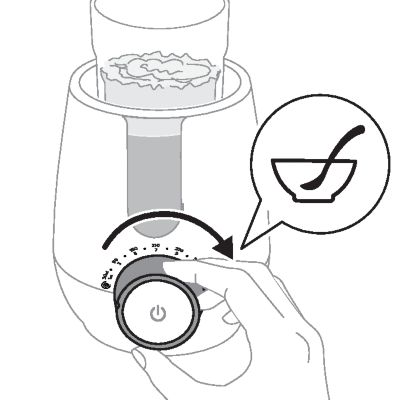
- Select the baby food warming setting.
- Press the power button to start.
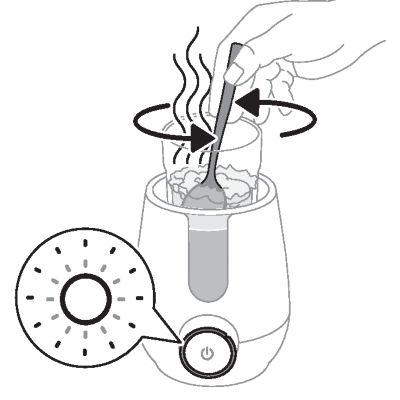
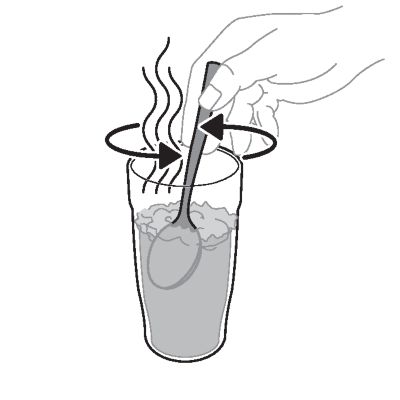
- The full progress indicator flashes to show warming is in progress. Stir the baby food to make sure it warms evenly.
- Determining precise baby food warming times is not possible due to variations in consistency.
- Be careful not to burn your hands by holding the food container while stirring. The container may be hot.
- When warming is complete, the appliance beeps 3 times and the progress indicator is solid on.
- The appliance changes to keep warm mode and switches off automatically after 60 minutes (including warming time).
- Take out the food and gently stir it, then test the temperature by tasting it to make sure it is safe for feeding your baby.
- Always check food temperature before feeding your baby.
- Press the power button to switch off the appliance.
- Let the water cool down, then unplug the appliance and pour out the water sideways into the sink to avoid spilling on the knob or mains plug.

To quickly learn how to defrost and warm frozen baby food, check out our helpful how-to video here.
You can also follow the directions below.
The keep warm/defrost setting is used to defrost baby food. For this setting, the appliance's built-in sensor detects the temperature of the container contents and adjusts the heating pattern between defrosting them or keeping them warm. For frozen baby food, this setting only defrosts the baby food, and then you must restart the appliance and use the baby food warming setting to warm the food to the desired temperature.
- Plug in the appliance and place the container with the frozen baby food inside.
- Only use plastic food containers for freezing baby food. Glass containers may break when defrosting.
- Add water:
- Only use room temperature water for accurate warming results.
- Use the window on the front of the appliance to check the water level.
-
- For small food volumes, add water up to the level of the food.
-
- For large food volumes above the top of the base, fill up to 1 cm/0.4 in below the rim of the base.
-
- Select the keep warm/defrost setting.
- Press the power button to start.
- The full progress indicator flashes to show warming is in progress.
- For reference, it takes around 60 minutes to defrost 180 ml/6 oz of frozen baby food. Total defrosting time may be longer or shorter depending on the amount of food and the container material.
- When warming is complete, the appliance beeps 3 times and the progress indicator is solid on.
- Press the power button to switch off the appliance.
- The appliance must be switched off and then back on before warming defrosted baby food or the baby food warming setting will not work.
- Select the baby food warming setting.
- Press the power button to start.
- The full progress indicator flashes to show warming is in progress. Stir the baby food to make sure it warms evenly.
- Determining precise baby food warming times is not possible due to variations in consistency.
- Be careful not to burn your hands by holding the food container while stirring. The container may be hot.
- When warming is complete, the appliance beeps 3 times and the progress indicator is solid on.
- The appliance changes to keep warm mode and switches off automatically after 60 minutes (including warming time).
- Take out the food and gently stir it, then test the temperature by tasting it to make sure it is safe for feeding your baby.
- Always check food temperature before feeding your baby.
- Press the power button to switch off the appliance.
- Let the water cool down, then unplug the appliance and pour out the water sideways into the sink to avoid spilling on the knob or mains plug.
To quickly learn how to sterilize your bottles and baby items, check out our helpful how-to video here.
You can also follow the directions below.
Check and make sure your bottles and baby items are safe for sterilization before getting started.
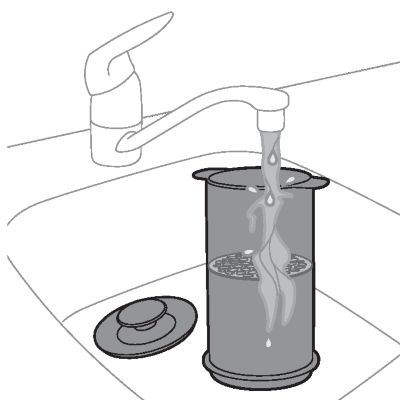
- Clean your bottles and baby items thoroughly with lukewarm water and mild detergent.
- Fill the base with water up to the marking (60 ml/2 oz).
- Note: This appliance has been designed to be used with tap water. If you live in an area with hard water, fast scale build-up may occur. Therefore, it is recommended to use distilled or demineralized water to prolong the lifetime of the appliance.
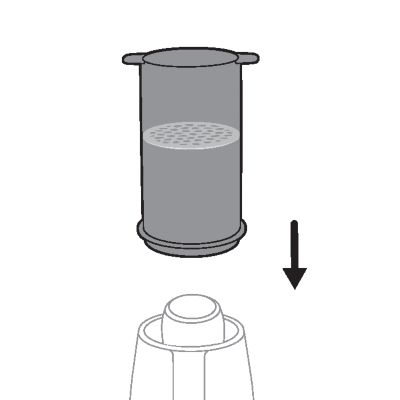
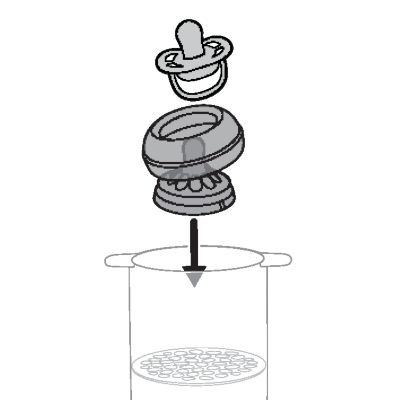
- Place a bottle or another large baby item in the base with the opening facing down.
- Do not place small or thin items in the base that can fit through the screen at the bottom to avoid damage and melting.
- Place the sterilization attachment on the base.
- Make sure your smaller items are fully disassembled, then place them in the top compartment of the sterilization attachment with their openings pointing down in the order shown: nipple > screw ring > pacifier/soother. You can also watch this helpful video for more tips.
- Place the lid on the sterilization attachment.
- Make sure the items don't prevent the lid from closing.
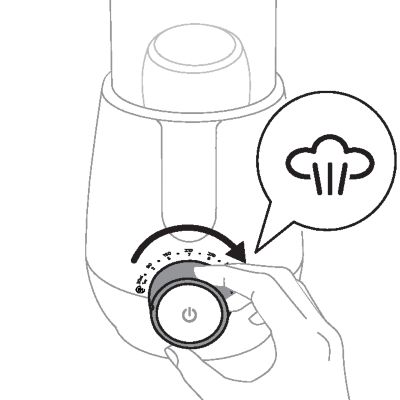
- Select the sterilizing setting.
- The base, sterilization attachment and lid become hot during or shortly after operation.
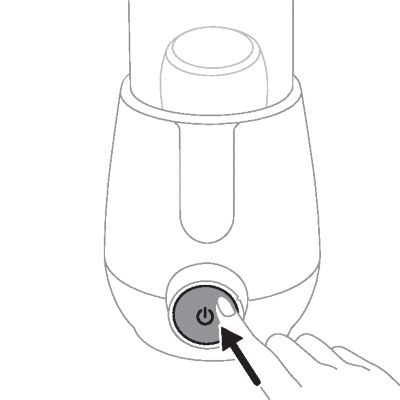
- Press the power button to start.
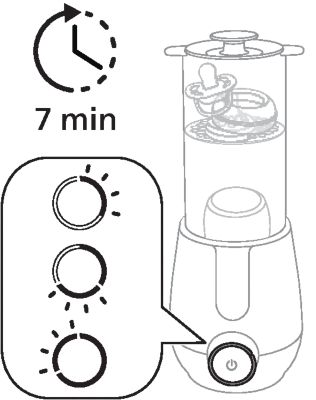
- The progress indicator flashes and fills gradually to show progress. The full sterilization cycle takes around 7 minutes.
- When sterilizing is complete, the appliance beeps three times and the progress indicator is solid on.
- Wait for the appliance to cool down before removing the lid.
- Be careful of hot surfaces and steam coming out of the appliance.
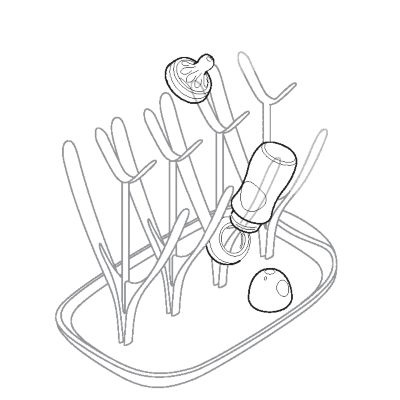
- Take out the sterilized items and place them on a clean towel or drying rack to air-dry.
- Wash your hands thoroughly before removing items from the sterilization attachment.
- Use tongs to remove small baby items from the top compartment.

Check the following tables to learn how long it may take to warm milk based on the milk volume and temperature.
Liquid milk warming times
| Setting | Room temperature milk (22 °C/72 °F) | Cold/refrigerated milk (5 °C/41 °F) |
| 30 ml/1 oz | 4:00-4:15 min | 4:00-4:15 min |
| 60 ml/2 oz | 2:45-3:30 min | 4:45-5:30 min |
| 90 ml/3 oz | 3:00-4:00 min | 5:00-6:00 min |
| 120 ml/4 oz | 3:00-4:00 min | 5:00-6:00 min |
| 150 ml/5 oz | 3:00-4:00 min\t | 5:00-6:00 min |
| 180 ml/6 oz | 3:30-4:30 min | 5:30-6:30 min |
| 210 ml/7 oz | 3:30-4:30 min | 5:30-6:30 min |
| 240 ml/8 oz | 5:00-6:00 min | 6:30-7:30 min |
| 270 ml/9 oz | 5:00-6:00 min | 6:30-7:30 min |
| 300 ml/10 oz | 5:15-6:15 min | 6:45-7:45 min |
| 330 ml/11 oz | 5:30-6:30 min | 7:00-8:00 min |
Frozen milk (-10 °C/14 °F in milk bag)
| Volume | Heating time |
| 30 ml/1 oz | 20-25 min |
| 60 ml/2 oz | 30-35 min |
| 90 ml/3 oz | 35-40 min |
| 120 ml/4 oz | 45-50 min |
| 150 m/5 oz | 50-55 min |
| 180 ml/6 oz | 60-65 min |
When using the appliance to warm milk bags, always use the keep warm/defrost setting.
Check the following table for recommended milk warming settings based on your container type.
Përgatitja e cilësimeve të rekomanduara sipas llojit të enës së qumështit
| Ena e qumështit | Temperatura fillestare e qumështit | Vëllimi i qumështit | Cilësimi i rekomanduar |
| Qelq | 22°C | 1-3 oz/30-90 ml | 1 oz/30 ml |
| 4-6 oz/120-180 ml | 2 oz/60 ml | ||
| 7-8 oz/210-240 ml | 4 oz/120 ml | ||
| 5 °C | 1 oz/30 ml | 1 oz/30 ml | |
| 2-6 oz/60-180 ml | 2 oz/60 ml | ||
| 7-8 oz/210-240 ml | 4 oz/120 ml | ||
| Plastike | 22 °C ose 5 °C | 1-11 oz/30-330 ml | Cilësimi i vëllimit të qumështit |
| Silikon | 22 °C ose 5 °C | 1-9 oz/30-270 ml | Cilësimi i vëllimit të qumështit + 3-4 min |
| Qeska e ruajtjes së qumështit | 22 °C ose 5 °C | 1-6 oz/30-180 ml | Cilësimi i mbajtjes së ngrohtë/shkrirjes |
To quickly learn how to properly clean and descale the appliance, check out our helpful how-to video here.
You can also follow the directions below.
Descale the appliance every 2 weeks to ensure it works effectively.
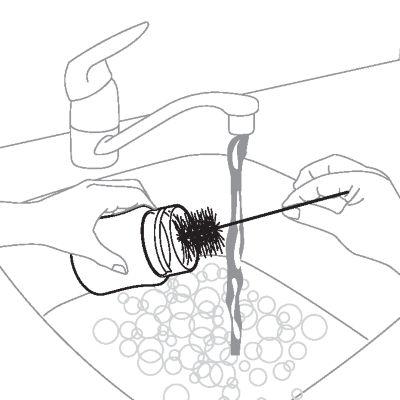
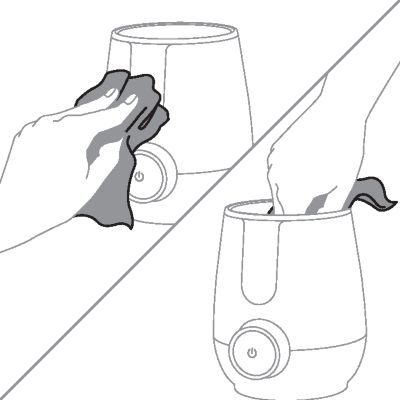
Cleaning
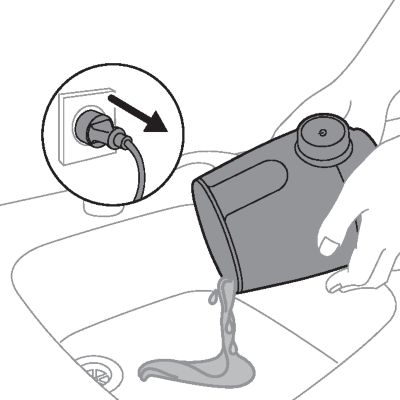
- Unplug the appliance, let it cool down, and then pour the water out sideways into the sink to avoid spilling on the knob or mains plug.
- Wipe the appliance with a damp cloth.
- Do not use abrasive, antibacterial cleaning agents, chemical solvents or sharp tools to clean the appliance.
- Clean the sterilizer attachment by hand washing or in the dishwasher.

Descaling
- Plug in the appliance and add a mixture of 60 ml/2 oz of white vinegar (5% acetic acid) and 120 ml/4 oz of water.
- Mix the water and vinegar separately before pouring it into the base.
- Select 180 ml/6 oz.
- Press the power button to start.
- The appliance beeps three times when the descaling solution reaches the correct temperature.
- Leave the descaling solution in the appliance until it switches off automatically after 60 minutes.
- Pour out the descaling solution sideways into the sink to avoid spilling on the knob and mains plug.
- Rinse out the appliance.
- Use a towel or cloth to wipe any remaining moisture off the appliance and let it air-dry completely before storage.

Pajisja Philips është në përputhje me të gjitha standardet dhe rregulloret në fuqi për ekspozimin ndaj fushave elektromagnetike.
Për të blerë aksesorë ose pjesë këmbimi, vizitoni www.philips.com/support ose drejtojuni shitësit tuaj të \"Philips\". Mund të kontaktoni edhe qendrën e kujdesit ndaj klientit të \"Philips\" në shtetin tuaj.
- Ky simbol do të thotë që produktet elektrike nuk duhet të hidhen me mbeturinat e zakonshme të shtëpisë.
- Zbatoni rregulloret e shtetit tuaj për grumbullimin e veçuar të produkteve elektrike.
Për mbështetje për të gjitha produktet, si p.sh. pyetjet e shpeshta, vizitoni www.philips.com/support.
Shënim: Për performancë optimale, kësaj pajisjeje duhet t'i pastrohet çmërsi rregullisht. Nëse nuk e bëni këtë, pajisja mund të mos funksionojë më. Në këtë rast, riparimi NUK mbulohet nga garancia.