0

Shopping cart

There are currently no items in your shopping cart.

    Philips Support

    How do I clean my Philips Shaver?

    Published on 18 July 2024
    Clean your Philips shaver regularly to ensure that it stays in top condition and provides a great shave every time. Below, you'll find an explanation of how to do this, and you can find more detailed instructions in the user manual provided with your shaver.

    If your Philips shaver's performance has decreased, please refer to the "Thorough Cleaning" section below.

    Please refer to this video for an overview of the information contained in this article. Enable subtitles on YouTube to see the video text in your own language.

    While shaver models differ, the same principles apply to all Philips shavers. Read the information below in full for more details.

    Before cleaning

    To prevent damage to your shaver, always check whether it is waterproof before cleaning it. Waterproof shavers have a small tap (figure 1) or bathtub (figure 2) symbol printed on the handle. If your device has a crossed-out tap (figure 3) printed on the handle, it should not be cleaned with water.

    Disconnect your shaver from the power outlet before cleaning.
    Icons indicating whether a shaver is waterproof or not

    Cleaning after every shave

    Philips recommends quickly cleaning your shaver after each shave to minimise the build-up of hair and debris around the shaving heads.

    For waterproof shavers: turn on your shaver and rinse the whole shaving unit (the top part of the shaver) under warm running water. Turn off your shaver.

    Depending on the shaver model, you can open the shaving unit by pressing the release button or gently pulling off the top. Opening it allows you to rinse out the inside of the shaving unit. Allow everything to air-dry before your next shave. The illustrations below demonstrate how to clean two common waterproof shaver models.

    For dry shavers: with your shaver turned off, blow on the top of the shaving unit to remove loose hairs and debris. 

    Depending on the shaver model, you can open the shaving unit by pressing the release button or gently pulling off the top. Opening the shaving unit allows you to clean the inside of it. You can do this using the cleaning brush provided with your shaver or a clean, soft paintbrush (or similar).
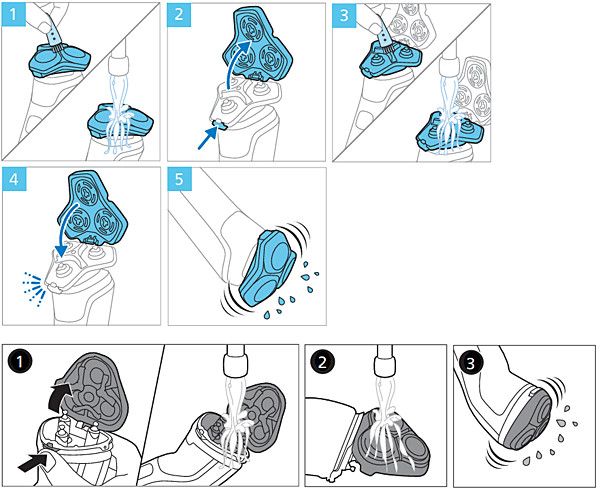
    Cleaning a Philips shaver after every shave

    SmartClean system and Quick Clean Pod

    If you have a SmartClean system or Quick Clean Pod for your Philips shaver, you can use it to clean and freshen it after each shave. Using the cleaning system replaces the regular cleaning steps mentioned in the section above.

    However, thorough cleaning is still required on a monthly basis (see details below).

    Thorough cleaning

    Philips recommends thoroughly cleaning your shaver at least once a month or whenever shaving performance decreases. 
    To clean your shaver thoroughly, you'll need to remove the shaving heads.

    Below, you can find illustrations showing how to remove and clean the shaving heads for two common types of Philips shavers. Please refer to the Frequently Asked Question "How do I remove the shaving heads of my Philips Shaver" or the user manual for detailed instructions for your shaver.

    For waterproof shavers: you can clean the cutters and guards separately after removing the shaving heads. Note that each cutter and guard forms a unique set, so try to avoid mixing them up. Once cleaned, allow all of the parts to air-dry before your next shave.

    For dry shavers: use the cleaning brush provided (or another soft, clean brush) to clean the shaving heads after removing them. Remove the cutter from the guard, then remove all visible hairs. Note that each cutter and guard forms a unique set, so try to avoid mixing them up.
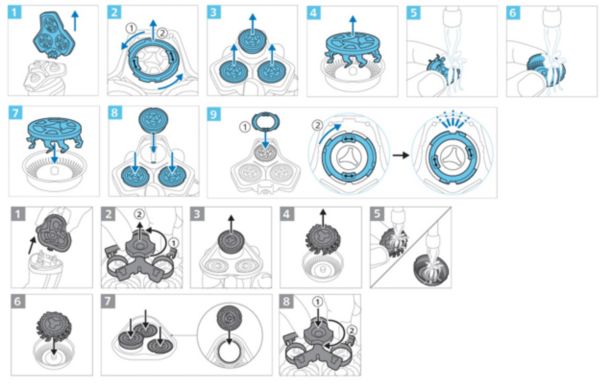
    Thorough cleaning of a Philips shaver

    Cleaning attachments

    If your Philips shaver has a pop-up trimmer or click-on attachments such as a precision trimmer, beard style or nose trimmer, these can all be cleaned under the tap using warm water.

    Allow the attachments to air-dry before subsequent use.

    Tip: For optimal performance, lubricate the teeth of the pop-up trimmer with a drop of mineral oil every six months.
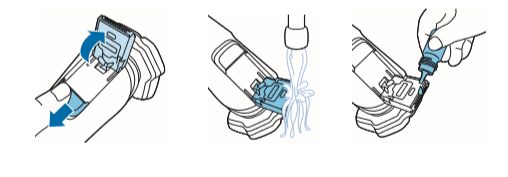
    Philips Cleaning Pop-up Trimmer

    The information on this page applies to the following models: S9975/54 , SP9882/36 , SP9841/32 , S9980/54 , SP9861/16R1 , SP9883/35R1 , S3342/13 , S9980/59 , S1134/00 , X3053/00 , X3051/00 , X3003/02 , X3003/00 , X3002/00 , X3001/00 , S3344/13 , S3343/13 , S3341/13 , S3243/12 , S3242/12 , S3241/12 , S3145/00 , S3144/00 , S3143/02 , S3143/00 , S1142/02 , S1142/00 , S9983/55 , S3230/52 , SP9885/35 , SP9871/22 , S9986/63 , S9982/59 , S9982/55 , S9980/74 , S9975/55 , S9974/55 , S9974/35 , S8697/23 , S8692/55 , S7886/55 , S7885/63 , S7882/54 , S7783/63 , S5898/50 , S5887/13 , S5885/69 , S5884/35 , S5583/38 , S7886/58 , S7882/55 , SP9840/31 , S7887/58 , S5884/69 , S8692/35 , S7886/63 , S5898/35 , S5898/25 , S5887/50 , S5887/10 , S5885/35 , S5885/25 , X5004/00 , X5006/00 , X5012/00 , S7885/55 , SP9883/36 , SP9883/35 , SP9840/32 , S8697/55 , S8697/35 , S8696/35 , S7887/63 , S7887/55 , S7887/35 , S7886/78 , S7886/35 , SP9863/14R1 , S9975/35 , SP9872/22 , S9987/50 , SP9872/15 , S9985/84 , S9987/85 , S7783/78 , S9986/55 , S9987/68 , S9987/59 , S9986/58 , S9985/50 , S9986/59 , S5466/17 , S5466/18 , S9987/55 , SP9820/18 , SP9863/14 , SP9860/16 , SP9860/13 , SP9820/18R1 , S5550/06R1 , S3333/58 , S5579/50 , S5587/10 , S5586/66 , S7786/50 , S5579/69 , S7788/59 , S7788/55 , S7786/59 , S7786/55 , S7783/59 , S7783/55 , S7782/53 , S5589/38 , S5589/30 , S5587/30 , S5585/35 , S5585/30 , S5585/10 , S5584/62 , S5584/50 , S5583/10 , S9211/12R1 , S5588/30 , S5588/38 , S9211/26R1 , S5550/06 , S3133/57 , S3540/06 , S5270/06R1 , S5530/06R1 , S1133/41 , S1333/41 , S5070/92R1 , S7370/12R1 , S1332/41 , S1030/04 , S1070/04 , S6630/11R1 , S5070/48R1 , S5240/06R1 , S3134/51 , S5050/04 , S1131/41 , S3333/54 , S3233/52 , S3231/52 , S3133/51 , S1232/41 , S1231/41 , S6630/11 , S3561/12 , S7970/26 , S6650/48 , S7930/16 , S5070/92 , SP9820/12 , SP9862/14 , SP9861/16 , SP9861/13 , SP9860/13R1 , SP9821/12 , S5070/48 , S3560/11 , S5073/62 , SW7700/67 , S7921/51 , SW9700/67 , SW6700/14 , SW5700/07 , SW3700/07 , S5270/06 , S7710/26 , S5572/40 , S5530/06 , S5240/06 , S5250/06 , S1300/04 , S5070/26 , S9211/12 , S3580/06 , S5360/06 , S5210/06 , S1141/00 , S9211/26 , S1320/04 , S5013/26 , S3120/06 , S1310/04 , S1100/04 , S1510/04 , S3110/06 , S5880/50 , S5898/79 , S5889/11 , S5887/69 , S5887/35 , S5884/38 , S5130/06 , S7530/50 , S7370/12 , S5600/41 , S5340/06 , S5320/06 , S738/17 , RQ1150/16 , S9111/43 , S9031/26 , RQ1155/81 , RQ1197/22 , YS521/17 , RQ1195/17 , RQ1141/17 , RQ1285/22 , RQ1251/22 , RQ1175/17 , RQ1151/17 , RQ1145/17 , RQ1160/16 , RQ1250/21 , RQ1160/22 , RQ1160/21 , RQ1150/17 , RQ1250/17 , RQ1180/17 , RQ1160/17 , RQ1180/16 , RQ1180/22 , RQ1250/16 , RQ1250/22 . Click here to show more product numbers Click here to show less product numbers

    Looking for something else?

    Discover all Philips Support options

    Our site can best be viewed with the latest version of Microsoft Edge, Google Chrome or Firefox.