Situation
TV broadcasts are received via a DVB-S (satellite) signal. The satellite channels can be installed directly on the TV.
Article Published Date : 2018-01-04
Situation
TV broadcasts are received via a DVB-S (satellite) signal. The satellite channels can be installed directly on the TV.
Ensure that:
• The satellite cable is firmly connected to the TV and the wall socket.
• The satellite dish is properly aligned and connected.
Proceed with the steps below to install satellite channels:
Connect the satellite cable to the “SAT 1” port on the TV.
Press the “Settings” button on the remote control and select:
[All settings] > [Channels] > [Satellite installation] > [Search for satellites] > [Search]
Or
during first installation of the TV:
Channels and Quick settings: [Install Satellite]
If one LNB is used, proceed with step 4. The configuration is already set correctly for one LNB.
If two or more LNBs are used, select [Configuration] to change the settings and select the satellites. Press “OK” on the remote control and proceed with step 4.
For a Unicable installation, proceed as follows:
• Select: [Configure] > [Installation system] > [Unicable for 1 satellite] or [Unicable for 2 satellites]
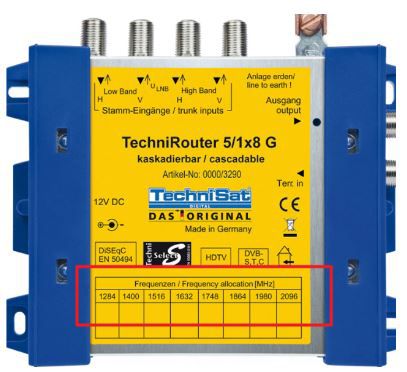
• Select the user band number and press “OK” on the remote control. Then press [Next] to enter the user band frequency (use the remote control digits to enter the frequency).
You can find the user band and the frequency on the unicable router or request the user band number via the technician that installed the router.

If you do not need to change the settings:
• Select [Search]
• The TV will now connect to the satellite(s). This can take several minutes.
• As soon as the satellites are found, the TV will show the names of the found satellites.
• Select [Install] and press “OK” on the remote control of the TV.
• Select the preferred type of installation from the list and press “OK” on the remote control:
One of the pre-sorted channel packages for your country (regular)
Unsorted (a full scan of all available channels)
Fast install (option differ per broadcaster)
• Select [Next] and press the “OK” button.
• The TV will now search for channels on every selected satellite. The installation takes around 10-15 minutes for each satellite. (Disclaimer: the amount of minutes can vary due to many factors).
A progress bar shows the status of the installation.
After all channels have been installed, a message appears stating: “Installation finished”.
• Select [Done] and press the “OK” button on the remote control.
Online privacy is related to interactive services (HbbTV) that providers offer with their channels. HbbTV reception can be switched [ON] or [OFF].
A TV channel will appear.